
Published on: Jun 15, 2021
Create a Note-taking App in Flutter
Flutter is a declarative framework that requires programming in Dart. Flutter is suitable for creating simple apps like Note-taking, Event-registration, etc.
Pre-requisites: Knowledge of basic Dart and Flutter. Read about Flutter and Dart.
With basic concepts like Widgets and Material design we can create simple apps very fast and easily in Flutter as in Flutter we can use tons of pre-designed widgets to create almost every popular design using in the modern design world.
In this tutorial, we discuss creating a simple note-taking app. The note-taking app we are going to create provides options like create, save, update and delete notes.
Our note-taking app contains two screens
- Home screen to display all saved notes
- Notes edit screen to create new notes or edit saved notes
Create Flutter App
Before creating a Flutter app please make sure you have installed flutter-sdk and dart-sdk. If not follow the instructions to install flutter.
Create a raw flutter app from the terminal. Run the following command and pass any name (to join more than single sting use only underscore)
1flutter create notes_app
2
Go to root directory of notes_app and locate main.dart in lib folder. This is where our app starts execution by calling the main() function. You can find some code here which displays the welcome screen.
Now to see the app in an emulator or on a physical device run the below command.
1cd notes_app/
2flutter run
3
For the initial run, it takes some time to install the app on the device, and later builds will be fast. If you encounter any error run flutter doctor -v for additional information and make sure all necessary items are checked.
What a Note should like and contain?
A simple note must have a title and the content which can be edited as many times as possible. We can also add color to note for look and feel.
To store notes we use Sqflite (a plugin to mimic SQL database in Flutter). Each note can be stored as a single row in the database with fields id, title, content, color.
Create a file note.dart inside lib/models. Add a class Note to store note as an object which can be converted later as a Map object to store in the database.
models/note.dart
1class Note { 2 int id; 3 String title; 4 String content; 5 String noteColor; 6 7 Note({ 8 this.id = null, 9 this.title = "Note", 10 this.content = "Text", 11 this.noteColor = 'red' 12 }); 13 14 Map<String, dynamic> toMap() { 15 Map<String, dynamic> data = Map<String, dynamic>(); 16 if (id != null) { 17 data['id'] = id; 18 } 19 data['title'] = title; 20 data['content'] = content; 21 data['noteColor'] = noteColor; 22 return data; 23 } 24 25 toString() { 26 return { 27 'id': id, 28 'title': title, 29 'content': content, 30 'noteColor': noteColor, 31 }.toString(); 32 } 33} 34
This Note class has attributes
- id (primary key) - an identifier to store unique note objects in the database
- title - the title of the note
- content - content of the note
- noteColor - the color of the note
toMap() returns note as an object to store in the database.
For note colors, add another file called theme/note_colors.dart inside lib/theme.
theme/note_colors.dart
1const NoteColors = { 2 'red': {'l': 0xFFFFCDD2,'b': 0xFFE57373}, 3 'pink': {'l': 0xFFF8BBD0, 'b': 0xFFF06292}, 4 'purple': {'l': 0xFFE1BEE7, 'b': 0xFFBA68C8}, 5 'deepPurple': {'l': 0xFFD1C4E9, 'b': 0xFF9575CD}, 6 'indigo': {'l': 0xFFC5CAE9, 'b': 0xFF7986CB}, 7 'blue': {'l': 0xFFBBDEFB, 'b': 0xFF64B5F6}, 8 'lightBlue': {'l': 0xFFB3E5FC, 'b': 0xFF4FC3F7}, 9 'cyan': {'l': 0xFFB2EBF2, 'b': 0xFF4DD0E1}, 10 'teal': {'l': 0xFFB2DFDB, 'b': 0xFF4DB6AC}, 11 'green': {'l': 0xFFC8E6C9, 'b': 0xFF81C784}, 12 'lightGreen': {'l': 0xFFDCEDC8, 'b': 0xFFAED581}, 13 'lime': {'l': 0xFFF0F4C3, 'b': 0xFFDCE775}, 14 'yellow': {'l': 0xFFFFF9C4, 'b': 0xFFFFF176}, 15 'amber': {'l': 0xFFFFECB3, 'b': 0xFFFFD54F}, 16 'orange': {'l': 0xFFFFE0B2, 'b': 0xFFFFB74D}, 17 'deepOrange': {'l': 0xFFFFCCBC, 'b': 0xFFFF8A65}, 18 'brown': {'l': 0xFFD7CCCB, 'b': 0xFFA1887F}, 19 'blueGray': {'l': 0xFFCFD8DC, 'b': 0xFF90A4AE}, 20}; 21
Each color name ('k') is a key and each key ('k') has two colors 'l' and 'b', where 'l' is a light color and 'b' is the bright color of this 'k' color. The light and bright colors are used to display a note in the UI which we discuss later. 'k' is the color name we store in the database.
Store notes in the database
Now to store notes on the database we use sqflite plugin. Install sqflite by adding dependency in pubspec.yaml.
1dependencies:
2  flutter:
3    sdk: flutter
4  sqflite: ^1.3.0
5
Now in terminal run flutter pub get to install or update dependencies in pubspec.yaml.
To handle database operations we write different functions for different operations like read, write, update and delete. Create notes_database.dart inside models and add a class to handle different operations
models/notes_database.dart
1import 'package:sqflite/sqflite.dart'; 2 3import 'note.dart'; 4 5class NotesDatabase { 6 static final _name = "NotesDatabase.db"; 7 static final _version = 1; 8 9 Database database; 10 static final tableName = 'notes'; 11 12 initDatabase() async { 13 database = await openDatabase( 14 _name, 15 version: _version, 16 onCreate: (Database db, int version) async { 17 await db.execute( 18 '''CREATE TABLE $tableName ( 19 id INTEGER PRIMARY KEY AUTOINCREMENT, 20 title TEXT, 21 content TEXT, 22 noteColor TEXT 23 )''' 24 ); 25 } 26 ); 27 } 28 29 Future<int> insertNote(Note note) async { 30 return await database.insert(tableName, 31 note.toMap(), 32 conflictAlgorithm: ConflictAlgorithm.replace 33 ); 34 } 35 36 Future<int> updateNote(Note note) async { 37 return await database.update(tableName, note.toMap(), 38 where: 'id = ?', 39 whereArgs: [note.id], 40 conflictAlgorithm: ConflictAlgorithm.replace 41 ); 42 } 43 44 Future<List<Map<String, dynamic>>> getAllNotes() async { 45 return await database.query(tableName); 46 } 47 48 Future<Map<String, dynamic>> getNotes(int id) async { 49 var result = await database.query(tableName, 50 where: 'id = ?', 51 whereArgs: [id] 52 ); 53 54 if (result.length > 0) { 55 return result.first; 56 } 57 58 return null; 59 } 60 61 Future<int> deleteNote(int id) async { 62 return await database.delete(tableName, 63 where: 'id = ?', 64 whereArgs: [id] 65 ); 66 } 67 68 closeDatabase() async { 69 await database.close(); 70 } 71} 72
First, we need to create a table in the database with some schema. Inside initDatabase(), we are calling openDatabase() to create database and table or open existing database and table by passing parameters _name (name of the database) and _version where _name = NotesDatabse.db is the name of the database and we can maintain different versions of the database through _version.
If there is no database with a specified name, onCreate callback is called to create a database with table and schema. Above we create a table with tableName = notes and initial schema with required fields like id, title, content, and noteColor to store a note object.
openDatabase() is an async operation and returns Database object reference which points to the created/existed database. We store this reference as database of type class Database.
Other functions insertNote, updateNote, getNotes and deleteNotes handles different database operations. Read more about how to perform different operations in sqflite.
As we cannot store Note as a class object we convert Note object members to a Map object by calling Note.toMap() which returns a Map object which sqflite map fields and values to store in the database. And Sqflite returns data as Map objects the way we pass it to insert rows in the database.
We have added logic to maintain notes in the database. But we have not done anything in UI to interact for maintaining notes.
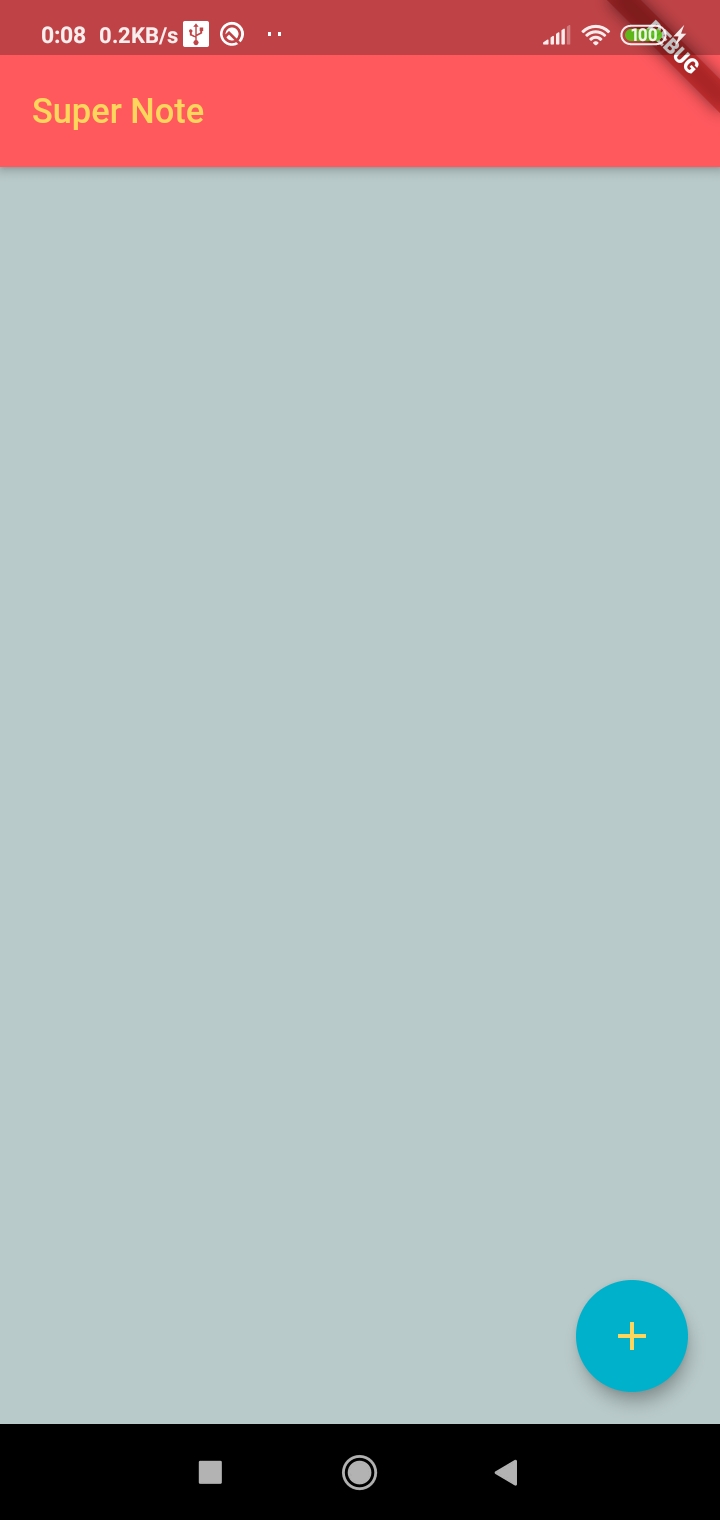
Add Home Screen
Now create a file called home.dart in lib/screens. This home.dart serves as the Home screen of our app. Add following code to home.dart
screens/home.dart
1import 'package:flutter/material.dart'; 2 3const c1 = 0xFFFDFFFC, c2 = 0xFFFF595E, c3 = 0xFF374B4A, c4 = 0xFF00B1CC, c5 = 0xFFFFD65C, c6 = 0xFFB9CACA, 4 c7 = 0x80374B4A, c8 = 0x3300B1CC, c9 = 0xCCFF595E; 5 6// Home Screen 7class Home extends StatefulWidget{ 8 9 _Home createState() => _Home(); 10} 11 12class _Home extends State<Home> { 13 14 Widget build(BuildContext context) { 15 return MaterialApp( 16 title: 'Super Note', 17 home: Scaffold( 18 backgroundColor: Color(c6), 19 appBar: AppBar( 20 automaticallyImplyLeading: false, 21 backgroundColor: const Color(c2), 22 brightness: Brightness.dark, 23 24 title: Text( 25 'Super Note', 26 style: TextStyle( 27 color: const Color(c5), 28 ), 29 ), 30 ), 31 32 //Floating Button 33 floatingActionButton: FloatingActionButton( 34 child: const Icon( 35 Icons.add, 36 color: const Color(c5), 37 ), 38 tooltip: 'New Notes', 39 backgroundColor: const Color(c4), 40 onPressed: () => {}, 41 ), 42 ), 43 ); 44 } 45} 46
There are some color constants defined at the top which will be used across the app. The color format in Flutter is different from normal Hex. In normal Hex format, we provide opacity at last but in Flutter we have to provide opacity at first.
Here we are creating a Home widget as StatefulWidget keeping in mind that we need to maintain the state. Every custom widget must override build method and return a widget. MaterialApp widget gives child widgets material look and we must declare required attributes. Scaffold widget is a common material design concept that provides appbar, floating button, drawer, body, etc.
The Home screen displays all notes stored in the database. We discuss later displaying notes in the Home screen after creating notes in the Edit screen.
To display our Home screen as default screen in our app call Home() widget inside MyApp in main.dart
main.dart
1import 'package:flutter/material.dart'; 2 3import './screens/home.dart'; 4 5void main() => runApp(MyApp()); 6 7class MyApp extends StatelessWidget { 8 9 Widget build(BuildContext context) { 10 return MaterialApp( 11 home: Home(), 12 ); 13 } 14} 15
To see the changes in the app, in the flutter running environment press r to hot reload or R restart of the app.
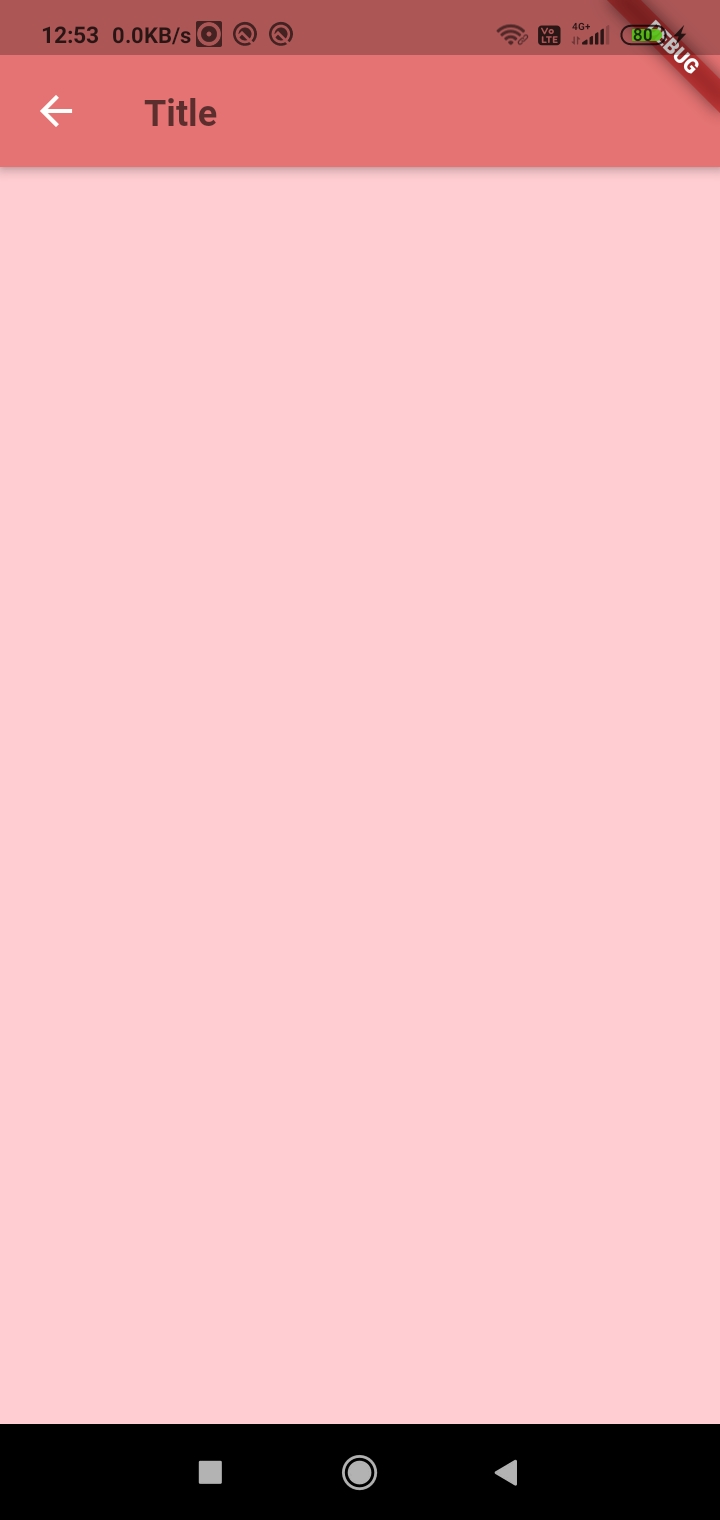
The Floating action button at the bottom-right will take us to the Edit screen to create a new note. To add navigation from Home to Edit, first create a Edit Screen Widget in notes_edit.dart inside lib/screens. For now, add a simple UI for the Edit screen like below because we just need a widget to route from Home to Edit screen.
screens/notes_edit.dart
1import 'package:flutter/material.dart'; 2 3const c1 = 0xFFFDFFFC, c2 = 0xFFFF595E, c3 = 0xFF374B4A, c4 = 0xFF00B1CC, c5 = 0xFFFFD65C, c6 = 0xFFB9CACA, 4 c7 = 0x80374B4A; 5 6class NotesEdit extends StatefulWidget { 7 _NotesEdit createState() => _NotesEdit(); 8} 9 10class _NotesEdit extends State<NotesEdit> { 11 12 Widget build(BuildContext context) { 13 return MaterialApp( 14 title: 'Edit Screen', 15 home: Text( 16 'Edit' 17 ), 18 ); 19 } 20} 21
NotesEdit widget is the main widget for the Edit screen. We call this widget in navigation.
Navigation from Home to Edit
Add navigation from Home to Edit when pressed floating-action-buttton. Call Navigation.push() for the EditNotes widget. In home.dart add navigation in onPressed() event of floating-action-button.
1import './notes_edit.dart';
2
1//Floating Button
2floatingActionButton: FloatingActionButton(
3	child: const Icon(
4		Icons.add,
5		color: const Color(c5),
6	),
7	tooltip: 'New Notes',
8	backgroundColor: const Color(c4),
9	// Go to Edit screen
10	onPressed: () {
11	  Navigator.push(
12	  	context,
13	    MaterialPageRoute(builder: (context) => NotesEdit()),
14	  );
15	}
16),
17
Change Edit Screen
Change Edit screen UI for creating a new note.
screens/notes_edit.dart
1import 'package:flutter/material.dart'; 2 3import '../models/note.dart'; 4import '../models/notes_database.dart'; 5import '../theme/note_colors.dart'; 6 7const c1 = 0xFFFDFFFC, c2 = 0xFFFF595E, c3 = 0xFF374B4A, c4 = 0xFF00B1CC, c5 = 0xFFFFD65C, c6 = 0xFFB9CACA, 8 c7 = 0x80374B4A; 9 10class NotesEdit extends StatefulWidget { 11 _NotesEdit createState() => _NotesEdit(); 12} 13 14class _NotesEdit extends State<NotesEdit> { 15 String noteTitle = ''; 16 String noteContent = ''; 17 String noteColor = 'red'; 18 19 TextEditingController _titleTextController = TextEditingController(); 20 TextEditingController _contentTextController = TextEditingController(); 21 22 void handleTitleTextChange() { 23 setState(() { 24 noteTitle = _titleTextController.text.trim(); 25 }); 26 } 27 28 void handleNoteTextChange() { 29 setState(() { 30 noteContent = _contentTextController.text.trim(); 31 }); 32 } 33 34 35 void initState() { 36 super.initState(); 37 _titleTextController.addListener(handleTitleTextChange); 38 _contentTextController.addListener(handleNoteTextChange); 39 } 40 41 42 void dispose() { 43 _titleTextController.dispose(); 44 _contentTextController.dispose(); 45 super.dispose(); 46 } 47 48 49 Widget build(BuildContext context) { 50 return Scaffold( 51 backgroundColor: Color(NoteColors[this.noteColor]['l']), 52 appBar: AppBar( 53 backgroundColor: Color(NoteColors[this.noteColor]['b']), 54 55 leading: IconButton( 56 icon: const Icon( 57 Icons.arrow_back, 58 color: const Color(c1), 59 ), 60 tooltip: 'Back', 61 onPressed: () => {}, 62 ), 63 64 title: NoteTitleEntry(_titleTextController), 65 ), 66 67 body: NoteEntry(_contentTextController), 68 ); 69 } 70} 71
In the above NotesEdit widget, the state variables noteTitle, noteContent and noteColor are initialized to default values for now. noteTitel is to store title of the note, noteContent is to store note content andnoteColor is color of the color, light and bright colors of the noteColor are used as backgroundColor for appBar and Scaffold respectively.
Also there are two TextEditingController defined which are used to controll TextField values for noteTitle and noteContent. These two text controller are attached with listeners in iniitState(). These listeneres listen to changes and updates text values in state. _titleTextController handles and updates text value for noteTitle and _contentTextController handles noteContent.
The title of the appBar is set to a widget NoteTitleEntry which handles displaying and editing of the title.
1class NoteTitleEntry extends StatelessWidget { 2 final _textFieldController; 3 4 NoteTitleEntry(this._textFieldController); 5 6 7 Widget build(BuildContext context) { 8 return TextField( 9 controller: _textFieldController, 10 decoration: InputDecoration( 11 border: InputBorder.none, 12 focusedBorder: InputBorder.none, 13 enabledBorder: InputBorder.none, 14 errorBorder: InputBorder.none, 15 disabledBorder: InputBorder.none, 16 contentPadding: EdgeInsets.all(0), 17 counter: null, 18 counterText: "", 19 hintText: 'Title', 20 hintStyle: TextStyle( 21 fontSize: 21, 22 fontWeight: FontWeight.bold, 23 height: 1.5, 24 ), 25 ), 26 maxLength: 31, 27 maxLines: 1, 28 style: TextStyle( 29 fontSize: 21, 30 fontWeight: FontWeight.bold, 31 height: 1.5, 32 color: Color(c1), 33 ), 34 textCapitalization: TextCapitalization.words, 35 ); 36 } 37} 38
In the TextField, the controller is set to _textFieldController which is passed from parent widget ** as **_titleTextController**.
Similarly, content of the notes is handled by another widget NoteEntry.
1class NoteEntry extends StatelessWidget { 2 final _textFieldController; 3 4 NoteEntry(this._textFieldController); 5 6 7 Widget build(BuildContext context) { 8 return Container( 9 height: MediaQuery.of(context).size.height, 10 padding: EdgeInsets.symmetric(horizontal: 12, vertical: 8), 11 child: TextField( 12 controller: _textFieldController, 13 maxLines: null, 14 textCapitalization: TextCapitalization.sentences, 15 decoration: null, 16 style: TextStyle( 17 fontSize: 19, 18 height: 1.5, 19 ), 20 ), 21 ); 22 } 23} 24
Here also controller of TextField is set to _textFieldController which is passed from parent wdiget as _contentTextController.
After adding all these widgets, the Edit screen would look like
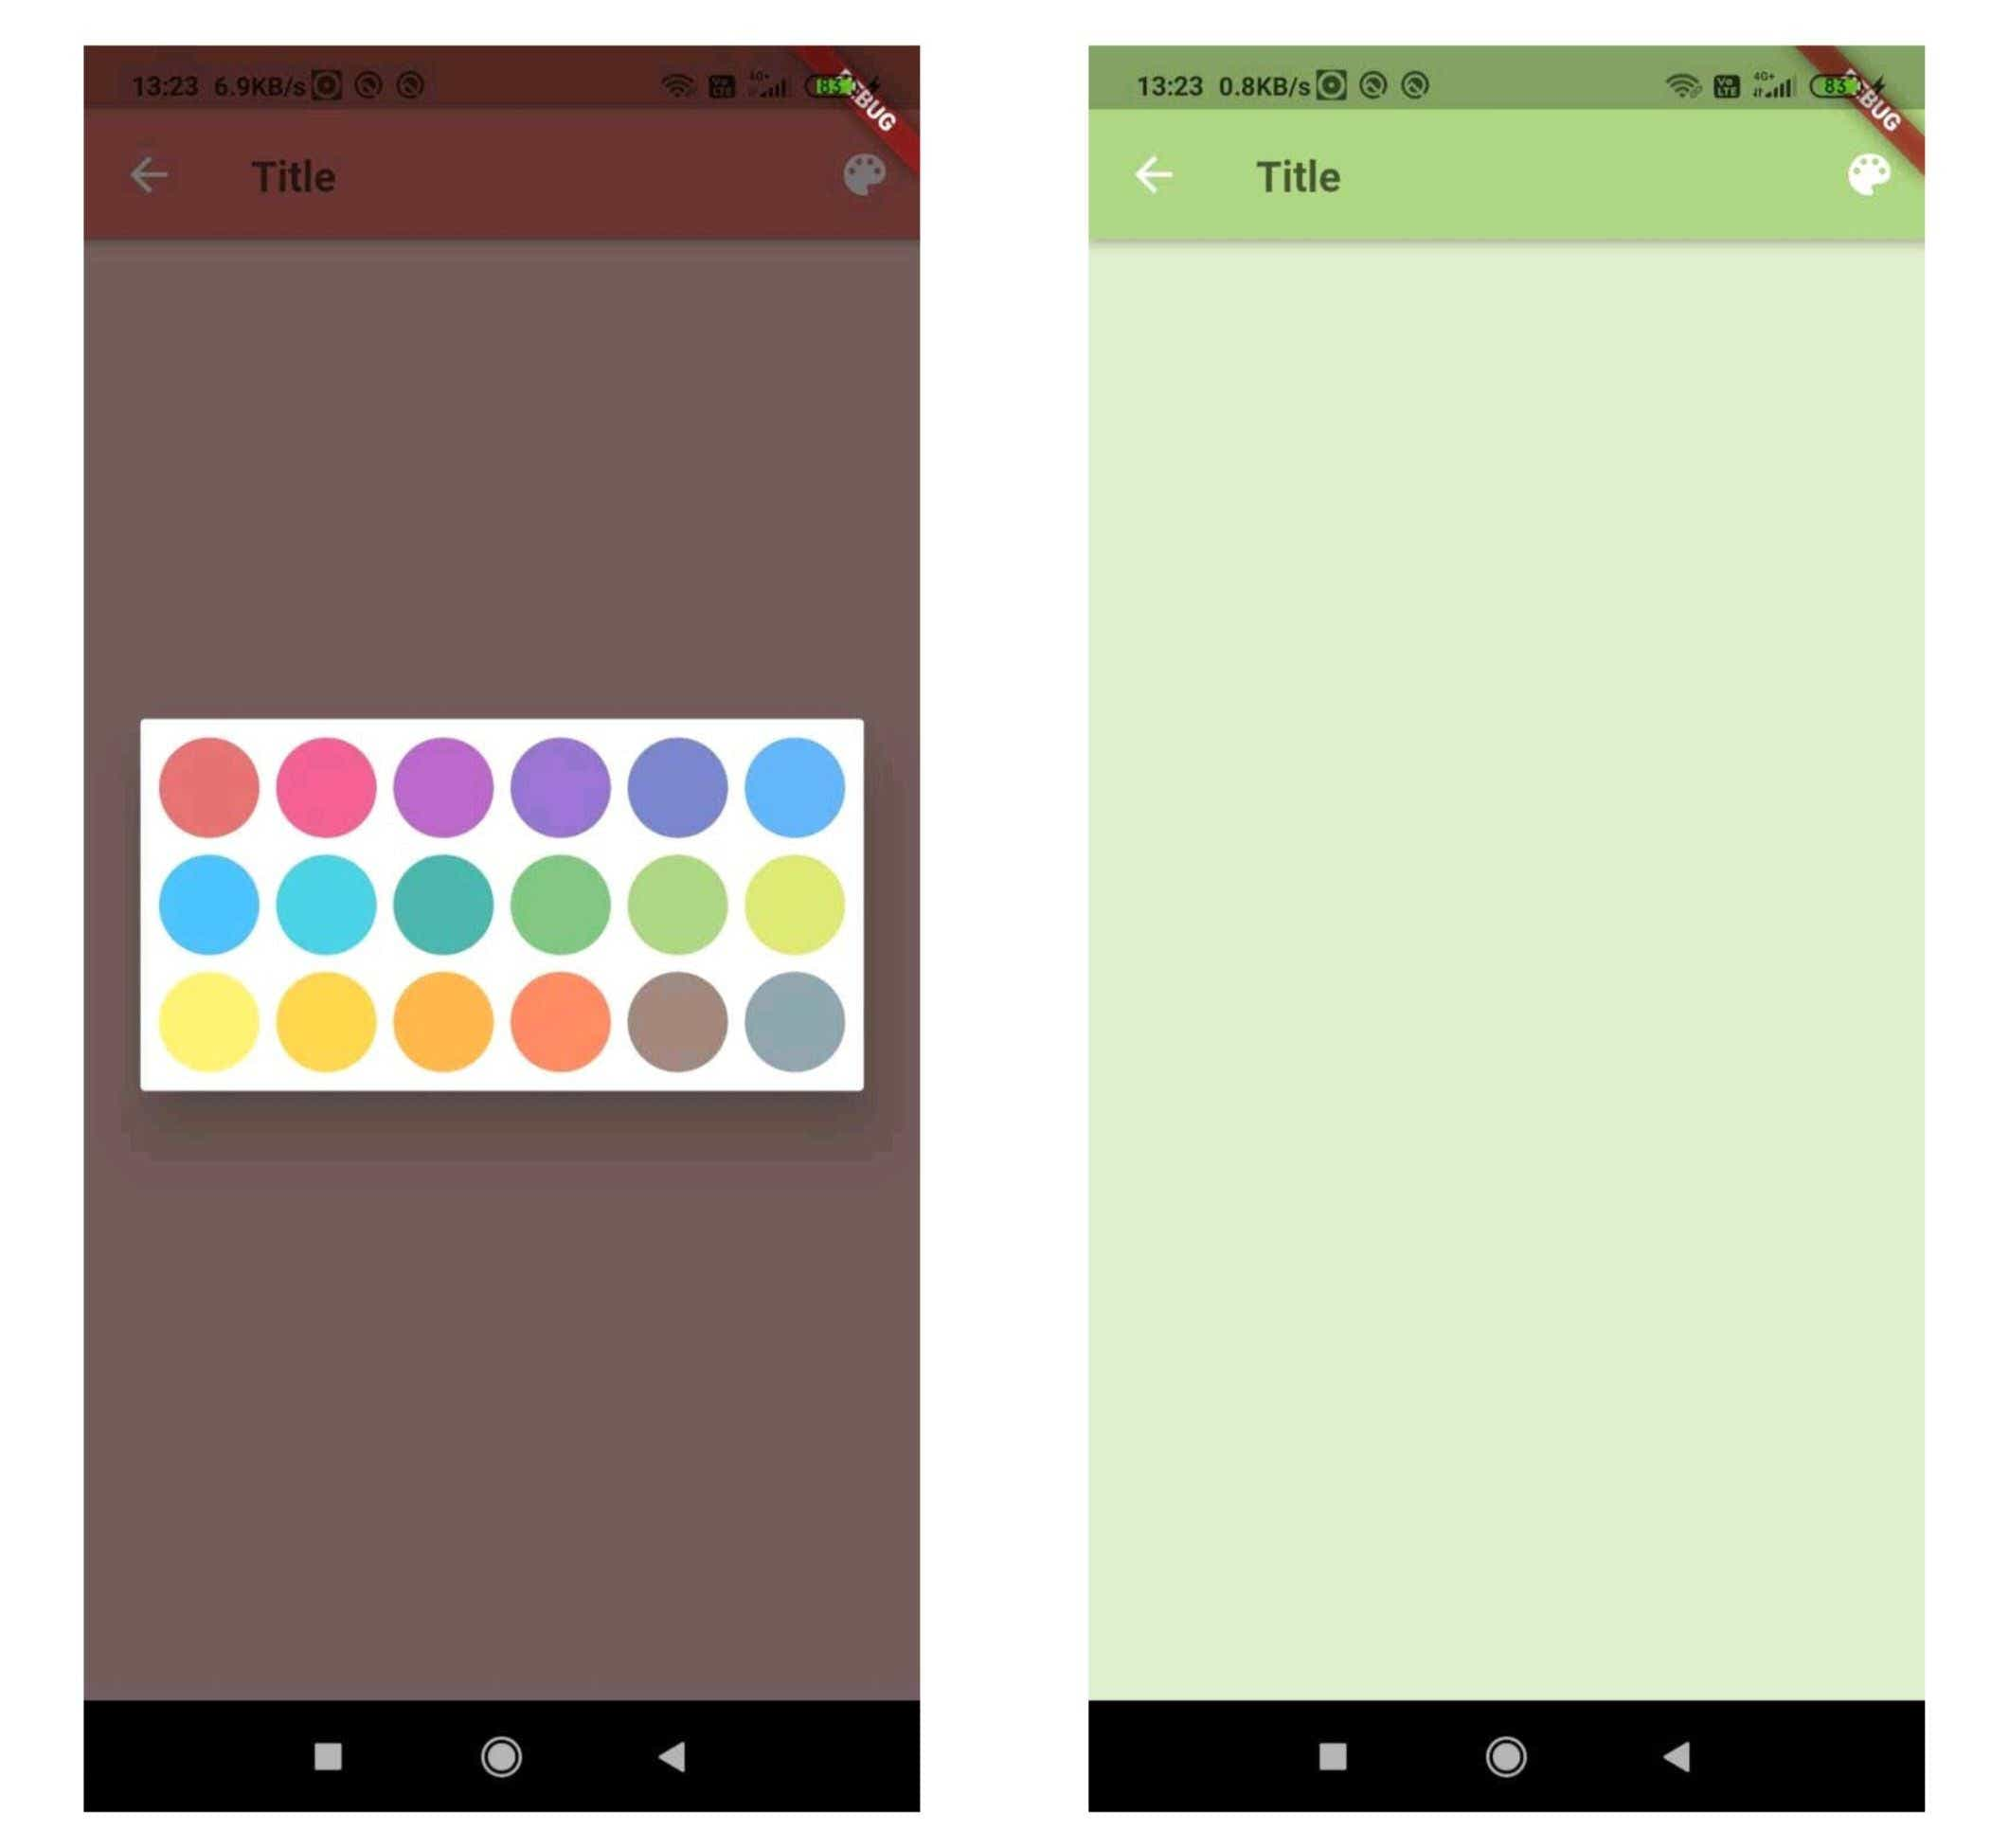
Add a Color palette to select Note color
We will add a color palette to select note color and store the value in noteColor. For color palette, add an icon in appBar actions which on press shows a Dialog box with different colors.
In NotesEdit add color palette button
1actions: [
2	IconButton(
3		icon: const Icon(
4			Icons.color_lens,
5			color: const Color(c1),
6		),
7		tooltip: 'Color Palette',
8		onPressed: () => handleColor(context),
9	),
10],
11
For this button, onPressed event calls handleColor() function which shows a color palette and store selected value in noteColor variable. Define handleColor() inside _NotesEdit
1void handleColor(currentContext) {
2	showDialog(
3		context: currentContext,
4		builder: (context) => ColorPalette(
5			parentContext: currentContext,
6		),
7	).then((colorName) {
8		if (colorName != null) {
9			setState(() {
10				noteColor = colorName;
11			});
12		}
13	});
14}
15
This handleColor() calls widget ColorPalette which is a Dialog box and returns selected color value. Add ColorPalette widget to show different colors and return selected color
1class ColorPalette extends StatelessWidget { 2 final parentContext; 3 4 const ColorPalette({ 5 this.parentContext, 6 }); 7 8 9 Widget build(BuildContext context) { 10 return Dialog( 11 backgroundColor: Color(c1), 12 clipBehavior: Clip.hardEdge, 13 insetPadding: EdgeInsets.all(MediaQuery.of(context).size.width * 0.03), 14 shape: RoundedRectangleBorder( 15 borderRadius: BorderRadius.circular(2), 16 ), 17 child: Container( 18 padding: EdgeInsets.all(8), 19 child: Wrap( 20 alignment: WrapAlignment.start, 21 spacing: MediaQuery.of(context).size.width * 0.02, 22 runSpacing: MediaQuery.of(context).size.width * 0.02, 23 children: NoteColors.entries.map((entry) { 24 return GestureDetector( 25 onTap: () => Navigator.of(context).pop(entry.key), 26 child: Container( 27 width: MediaQuery.of(context).size.width * 0.12, 28 height: MediaQuery.of(context).size.width * 0.12, 29 decoration: BoxDecoration( 30 borderRadius: BorderRadius.circular(MediaQuery.of(context).size.width * 0.06), 31 color: Color(entry.value['b']), 32 ), 33 ), 34 ); 35 }).toList(), 36 ), 37 ), 38 ); 39 } 40} 41
As we already stored different colors in NoteColors Map object, we iterate this object and fill the color palette with bright colors.
Save notes
We have everything to save notes in the database. We save a note in the database if backButton is pressed at the top. Now add a function to handle backButton onPressed.
1void handleBackButton() async {
2	if (noteTitle.length == 0) {
3		// Go Back without saving
4		if (noteContent.length == 0) {
5			Navigator.pop(context);
6			return;
7		}
8		else {
9			String title = noteContent.split('\n')[0];
10			if (title.length > 31) {
11				title = title.substring(0, 31);
12			}
13			setState(() {
14				noteTitle = title;
15			});
16		}
17	}
18
19	// Save New note
20	Note noteObj = Note(
21		title: noteTitle,
22		content: noteContent,
23		noteColor: noteColor
24	);
25	try {
26		await _insertNote(noteObj);
27	} catch (e) {
28		print('Error inserting row');
29	} finally {
30		Navigator.pop(context);
31		return;
32	}
33}
34
This function calls _insertNote() which saves the note object in the database.
1Future<void> _insertNote(Note note) async {
2  NotesDatabase notesDb = NotesDatabase();
3  await notesDb.initDatabase();
4  int result = await notesDb.insertNote(note);
5  await notesDb.closeDatabase();
6}
7
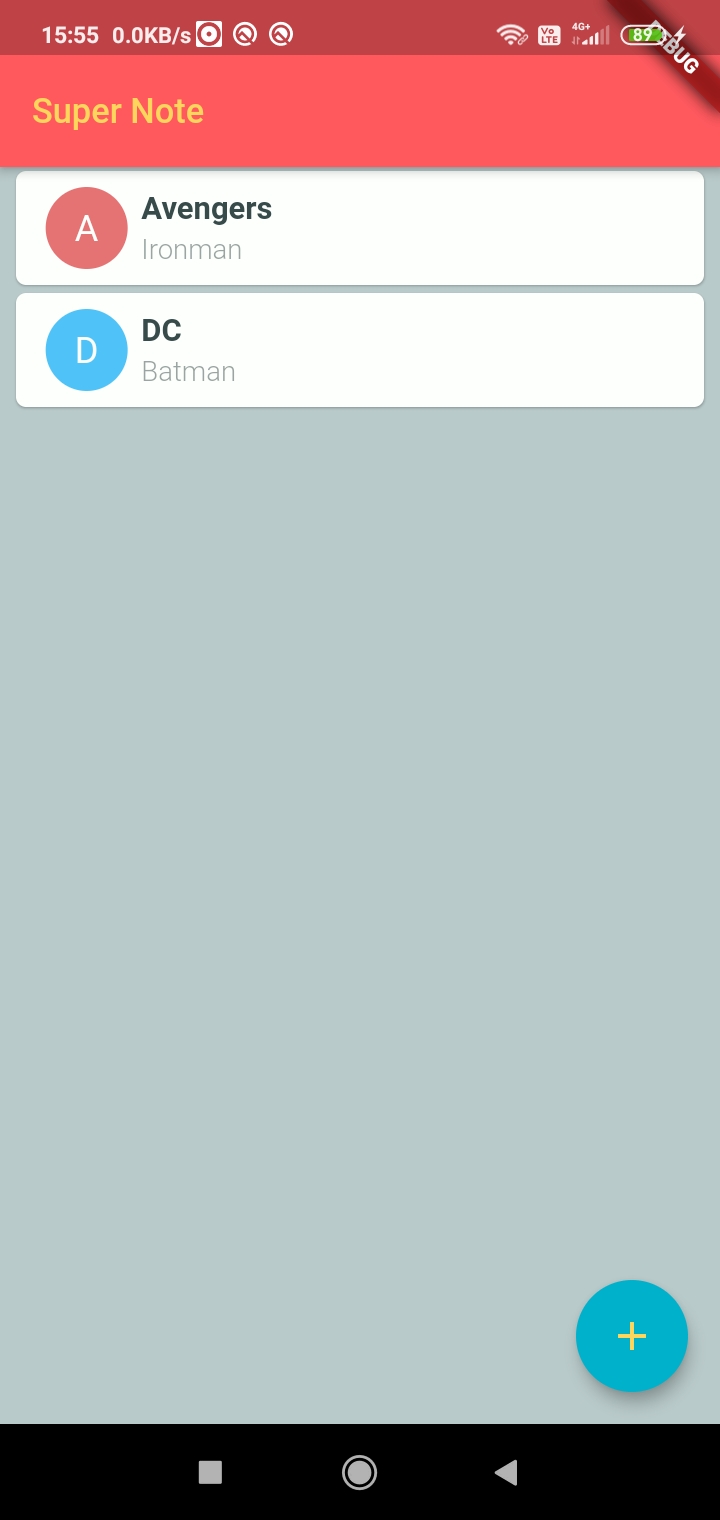
We have saved notes in the database, now in the Home screen, display the saved notes in list view.
Show saved notes on the Home screen
We can retrieve saved notes from the database and we use that retrieved data to show a note as a list on the Home screen. As retrieving data from the database is an async task and we need to have data before building the Home widget, we use FutureBuilder.
1Future<List<Map<String, dynamic>>> readDatabase() async {
2	try {
3	  NotesDatabase notesDb = NotesDatabase();
4	  await notesDb.initDatabase();
5	  List<Map> notesList = await notesDb.getAllNotes();
6	  await notesDb.closeDatabase();
7	  List<Map<String, dynamic>> notesData = List<Map<String, dynamic>>.from(notesList);
8	 	notesData.sort((a, b) => (a['title']).compareTo(b['title']));
9	  return notesData;
10	} catch(e) {
11		print('Error retrieving notes');
12		return [{}];
13	}
14}
15
This function reads all saved notes in the database and returns them as Future objects. We call this function in FutureBuilder and it builds the note list which displays each notes as a list.
Before that add necessary imports in home.dart to handle the database, to store note object and colors.
1import '../models/note.dart';
2import '../models/notes_database.dart';
3import '../theme/note_colors.dart';
4
Store read notes from database in state and define other state variables
1List<Map<String, dynamic>> notesData;
2List<int> selectedNoteIds = [];
3
notesData stores all notes data read from database and selectedNoteIds will have a list of selected notes when a note is selected in Home.
1body: FutureBuilder(
2	future: readDatabase(),
3	builder: (context, snapshot) {
4		if (snapshot.hasData) {
5			notesData = snapshot.data;
6			return Stack(
7				children: <Widget>[
8					// Display Notes
9					AllNoteLists(
10						snapshot.data,
11						this.selectedNoteIds,
12						afterNavigatorPop,
13						handleNoteListLongPress,
14						handleNoteListTapAfterSelect,
15					),
16				],
17			);
18		} else if (snapshot.hasError) {
19			print('Error reading database');
20		} else {
21			return Center(
22				child: CircularProgressIndicator(
23					backgroundColor: Color(c3),
24				),
25			);
26		}
27	}
28),
29
Here before building the widget we read the data from the database and builds a list of note widgets to display on the Home screen by calling AllNoteLists widget. We also pass different callback functions to AllNoteLists to handles cases like the long selection of note, deselect a note, etc.
Define all these functions inside _Home
1// Render the screen and update changes
2void afterNavigatorPop() {
3	setState(() {});
4}
5
6// Long Press handler to display bottom bar
7void handleNoteListLongPress(int id) {
8	setState(() {
9		if (selectedNoteIds.contains(id) == false) {
10			selectedNoteIds.add(id);
11		}
12	});
13}
14
15// Remove selection after long press
16void handleNoteListTapAfterSelect(int id) {
17	setState(() {
18		if (selectedNoteIds.contains(id) == true) {
19			selectedNoteIds.remove(id);
20		}
21	});
22}
23
24// Delete Note/Notes
25void handleDelete() async {
26	try {
27		NotesDatabase notesDb = NotesDatabase();
28		await notesDb.initDatabase();
29		for (int id in selectedNoteIds) {
30			int result = await notesDb.deleteNote(id);
31		}
32		await notesDb.closeDatabase();
33	} catch (e) {
34
35	} finally {
36		setState(() {
37			selectedNoteIds = [];
38		});
39	}
40}
41
Define AllNoteLists widget which gets arguments from parent widget including note data and callback functions to handle
1// Display all notes 2class AllNoteLists extends StatelessWidget { 3 final data; 4 final selectedNoteIds; 5 final afterNavigatorPop; 6 final handleNoteListLongPress; 7 final handleNoteListTapAfterSelect; 8 9 AllNoteLists( 10 this.data, 11 this.selectedNoteIds, 12 this.afterNavigatorPop, 13 this.handleNoteListLongPress, 14 this.handleNoteListTapAfterSelect, 15 ); 16 17 18 Widget build(BuildContext context) { 19 return ListView.builder( 20 itemCount: data.length, 21 itemBuilder: (context, index) { 22 dynamic item = data[index]; 23 return DisplayNotes( 24 item, 25 selectedNoteIds, 26 (selectedNoteIds.contains(item['id']) == false? false: true), 27 afterNavigatorPop, 28 handleNoteListLongPress, 29 handleNoteListTapAfterSelect, 30 ); 31 } 32 ); 33 } 34} 35 36 37// A Note view showing title, first line of note and color 38class DisplayNotes extends StatelessWidget { 39 final notesData; 40 final selectedNoteIds; 41 final selectedNote; 42 final callAfterNavigatorPop; 43 final handleNoteListLongPress; 44 final handleNoteListTapAfterSelect; 45 46 DisplayNotes( 47 this.notesData, 48 this.selectedNoteIds, 49 this.selectedNote, 50 this.callAfterNavigatorPop, 51 this.handleNoteListLongPress, 52 this.handleNoteListTapAfterSelect, 53 ); 54 55 56 Widget build(BuildContext context) { 57 return Padding( 58 padding: const EdgeInsets.symmetric(horizontal: 8.0, vertical: 2.0), 59 child: Material( 60 elevation: 1, 61 color: (selectedNote == false? Color(c1): Color(c8)), 62 clipBehavior: Clip.hardEdge, 63 borderRadius: BorderRadius.circular(5.0), 64 child: InkWell( 65 onTap: () { 66 if (selectedNote == false) { 67 if (selectedNoteIds.length == 0) { 68 // Go to edit screen to update notes 69 } 70 else { 71 handleNoteListLongPress(notesData['id']); 72 } 73 } 74 else { 75 handleNoteListTapAfterSelect(notesData['id']); 76 } 77 }, 78 79 onLongPress: () { 80 handleNoteListLongPress(notesData['id']); 81 }, 82 child: Container( 83 width: MediaQuery.of(context).size.width, 84 padding: const EdgeInsets.symmetric(horizontal: 8.0, vertical: 8.0), 85 child: Row( 86 children: <Widget>[ 87 Expanded( 88 flex: 1, 89 child: Column( 90 mainAxisAlignment: MainAxisAlignment.center, 91 crossAxisAlignment: CrossAxisAlignment.center, 92 mainAxisSize: MainAxisSize.min, 93 children: <Widget>[ 94 Container( 95 alignment: Alignment.center, 96 decoration: BoxDecoration( 97 color: (selectedNote == false? 98 Color(NoteColors[notesData['noteColor']]['b']): 99 Color(c9) 100 ), 101 shape: BoxShape.circle, 102 ), 103 child: Padding( 104 padding: EdgeInsets.all(10), 105 child: ( 106 selectedNote == false? 107 Text( 108 notesData['title'][0], 109 style: TextStyle( 110 color: Color(c1), 111 fontSize: 21, 112 ), 113 ): 114 Icon( 115 Icons.check, 116 color: Color(c1), 117 size: 21, 118 ) 119 ), 120 ), 121 ), 122 ], 123 ), 124 ), 125 126 Expanded( 127 flex: 5, 128 child: Column( 129 mainAxisAlignment: MainAxisAlignment.spaceAround, 130 crossAxisAlignment: CrossAxisAlignment.start, 131 mainAxisSize: MainAxisSize.min, 132 children:<Widget>[ 133 Text( 134 notesData['title'] != null? notesData['title']: "", 135 style: TextStyle( 136 color: Color(c3), 137 fontSize: 18, 138 fontWeight: FontWeight.bold, 139 ), 140 ), 141 142 Container( 143 height: 3, 144 ), 145 146 Text( 147 notesData['content'] != null? notesData['content'].split('\n')[0]: "", 148 style: TextStyle( 149 color: Color(c7), 150 fontSize: 16, 151 fontWeight: FontWeight.w300, 152 ), 153 ), 154 ], 155 ), 156 ), 157 ], 158 ), 159 ), 160 ), 161 ), 162 ); 163 } 164} 165
AllNoteLists builds a list of notes from the Map of a list of notes. In ListView builder it passes each note extracted data to another widget DisplayNotes which represents each note.
Now Home screen displays all notes stored as
Long press on the note to select the note. And if a note is selected we can add a delete action to delete the selected notes. Add Delete button at appBar actions which shows delete icon only if any note is selected.
1actions: [
2	(selectedNoteIds.length > 0?
3		IconButton(
4			icon: const Icon(
5				Icons.delete,
6				color: const Color(c1),
7			),
8			tooltip: 'Delete',
9			onPressed: () => handleDelete(),
10		):
11		Container()
12	),
13],
14
Define hanldeDelete() which deletes all selected notes from database.
1// Delete Notes
2void handleDelete() async {
3	try {
4		NotesDatabase notesDb = NotesDatabase();
5		await notesDb.initDatabase();
6		for (int id in selectedNoteIds) {
7			int result = await notesDb.deleteNote(id);
8		}
9		await notesDb.closeDatabase();
10	} catch (e) {
11		print('Cannot delete notes');
12	} finally {
13		setState(() {
14			selectedNoteIds = [];
15		});
16	}
17}
18
For notes, we have added create, read and delete functions. Now we will add an update function to edit already stored notes.
Update notes
For this, we can use the Edit screen to update the notes as it has all features to create notes which are similar for update notes also. We have to tell the Edit screen which type of notes operations we doing either create or update notes. To inform the Edit screen we can pass arguments to NotesEdit widget while routing about the type of action and notes data if the action is to update. Change NotesEdit widget to accept arguments telling the type of action and necessary data.
1class NotesEdit extends StatefulWidget {
2	final args;
3
4	const NotesEdit(this.args);
5	_NotesEdit createState() => _NotesEdit();
6}
7
args stores parameters passed from parent widget.
Change navigation arguments for NotesEdit in the floating-action-button in _Home.
1//Floating Button
2floatingActionButton: FloatingActionButton(
3	child: const Icon(
4		Icons.add,
5		color: const Color(c5),
6	),
7	tooltip: 'New Notes',
8	backgroundColor: const Color(c4),
9	onPressed: () {
10	  Navigator.push(
11	  	context,
12	    MaterialPageRoute(builder: (context) => NotesEdit(['new', {}])),
13	  );
14	}
15),
16
As floating-button triggers the creation of a new note, we pass argument new to inform NotesEdit that operation in creation of note.
When tapped on a note on the Home screen we navigate to the Edit screen to update the note. For this add navigation from Home to Edit when tapped on the note in DisplayNotes.
1child: InkWell(
2onTap: () {
3	if (selectedNote == false) {
4		if (selectedNoteIds.length == 0) {
5			Navigator.push(
6				context,
7        MaterialPageRoute(
8          builder: (context) => NotesEdit(['update', notesData]),
9        ),
10			).then((dynamic value) {
11					callAfterNavigatorPop();
12				}
13			);
14			return;
15		}
16		else {
17			handleNoteListLongPress(notesData['id']);
18		}
19	}
20	else {
21		handleNoteListTapAfterSelect(notesData['id']);
22	}
23},
24
We pass update and notesData to the Edit screen stating the operation is updating notes and note data to fill in the Edit screen.
Change NotesEdit widget in notes_edit.dart for handling update note operation.
1 2void initState() { 3 super.initState(); 4 noteTitle = (widget.args[0] == 'new'? '': widget.args[1]['title']); 5 noteContent = (widget.args[0] == 'new'? '': widget.args[1]['content']); 6 noteColor = (widget.args[0] == 'new'? 'red': widget.args[1]['noteColor']); 7 8 _titleTextController.text = (widget.args[0] == 'new'? '': widget.args[1]['title']); 9 _contentTextController.text = (widget.args[0] == 'new'? '': widget.args[1]['content']); 10 _titleTextController.addListener(handleTitleTextChange); 11 _contentTextController.addListener(handleNoteTextChange); 12} 13 14void handleBackButton() async { 15 if (noteTitle.length == 0) { 16 // Go Back without saving 17 if (noteContent.length == 0) { 18 Navigator.pop(context); 19 return; 20 } 21 else { 22 String title = noteContent.split('\n')[0]; 23 if (title.length > 31) { 24 title = title.substring(0, 31); 25 } 26 setState(() { 27 noteTitle = title; 28 }); 29 } 30 } 31 32 // Save New note 33 if (widget.args[0] == 'new') { 34 Note noteObj = Note( 35 title: noteTitle, 36 content: noteContent, 37 noteColor: noteColor 38 ); 39 try { 40 await _insertNote(noteObj); 41 } catch (e) { 42 43 } finally { 44 Navigator.pop(context); 45 return; 46 } 47 } 48 49 // Update Note 50 else if (widget.args[0] == 'update') { 51 Note noteObj = Note( 52 id: widget.args[1]['id'], 53 title: noteTitle, 54 content: noteContent, 55 noteColor: noteColor 56 ); 57 try { 58 await _updateNote(noteObj); 59 } catch (e) { 60 61 } finally { 62 Navigator.pop(context); 63 return; 64 } 65 } 66} 67
Tapping on the note in the Home screen will take us to the Edit screen to update notes.
This tutorial addressed how to create a simple note-taking app in Flutter with common operations like create, read, update and delete. We can extend the app to have multiple day-to-day useful features. I hope you will do that to create your own notes app according to your interests and needs.
I have created a full Android working application with additional features like Notes sharing, multi-select notes, deleting notes in the edit screen, sort text in notes, etc. Check out the full code at github.com/santhalakshminarayana/zehero-note.